
How to install the Payomatix WooCommerce plugin on WordPress?
We have a ready-to-install plugin for your WordPress/WooCommerce website, which will allow you (merchant) to make payments with Payomatix very easily just by installing and activating it.
Download PluginHow to install the Payomatix WordPress Plugin?
- First of all, please download the Payomatix WordPress plugin zip file.
- You can find the plugin zip file ( woocommerce-payomatix-payment-gateway.zip ) inside the Payomatix plugin repository.
- After downloading the plugin's zip file, please open your WordPress Admin Panel.
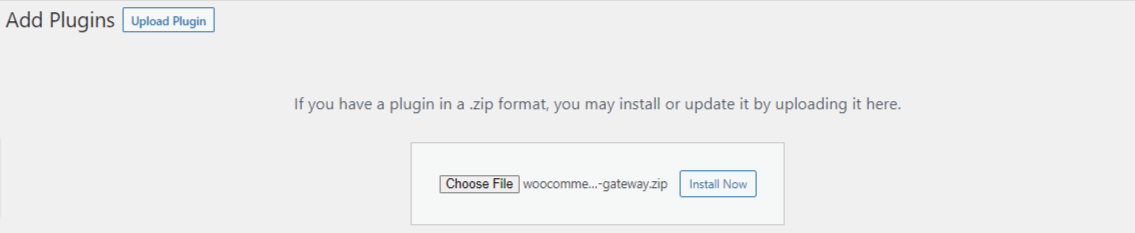
- Just go to the Plugins > Add New page, then click on the Upload Plugin button. You will find it just next to the "Add Plugins" title.
- Once you click it, you will see an interface like the one below. Just click on the "Choose File" button, then choose the Payomatix WordPress plugin zip file, and click on the "Install Now" button.
How to set up and enable the Payomatix WordPress plugin?
Once you have installed the Payomatix WordPress plugin, you will find the payment options inside WooCommerce settings.
- Let's go to the WordPress admin panel and then click on the WooCommerce > Settings > Payments menu.
- Once you open the WooCommerce Payments setting page, you will see the Payomatix Payment method. Just enable the Payomatix Payment method by click on the switch toggle button and enable it.

- Now, click on the "Manage" or "Set up" button to configure the Payomatix payment method. You must have a valid API Key to enable the Payomatix payment method. You can easily find the API Key in your Payomatix account. Once you go to the Payomatix payment method settings page, you will see an interface like the one below.
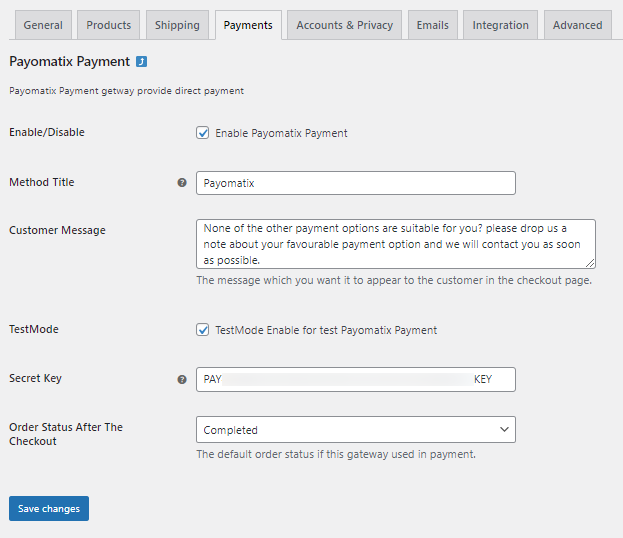
As you can see, you can easily change the Payomatix payment method settings and configure the payment method from the settings page.
- Enable/Disable: You can easily enable/disable the payment method using the "Enable Payomatix Payment method" checkbox.
- Method Title: You can set a custom payment method title for your customers. It will be displayed on the checkout page.
- Customer Message: You can add a custom message for your customers.
- TestMode: Enable Test Mode when you would like to test the Payomatix payment method and perform a test transaction using test card details.
- Secret Key: You must enter the Secret Key to make the Payomatix Payment method work. You can't even perform test transactions without an API Key.
- Order Status After The Checkout: You can customize the order status to automatically change the order status after successful payment has been received.